Plumbing

Hydro Jetting Service Process

How effective is hydro jetting?

What is Hydro Jetting & Why is it Needed?

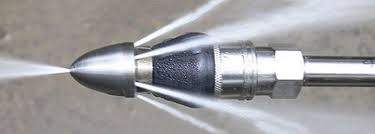
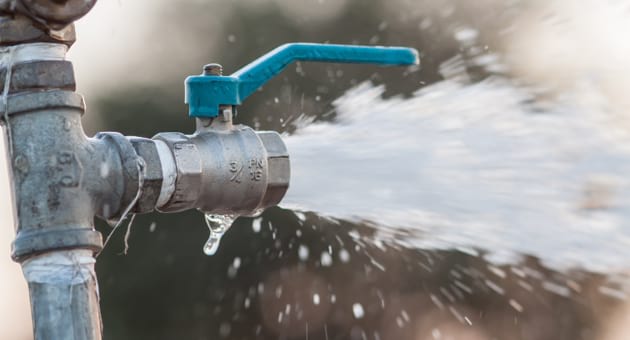
Hydro jetting is a service that uses a highly pressurized stream of water to remove a clog or blockage from a drain or pipe. Often, small obstructions can be removed with an auger or even a plunger. If the blockage is more severe, however, then hydro jetting is the most effective way of cleaning the pipe.

Hydro-jetting may be needed if:

  • Regular methods of drain cleaning, like snaking, won’t clear more severe blockages.
  • You experience slow drainage, recurring clogs, multiple drains clogging at one time, or a sewage back-up.
  • You are having any kind of work done on your pipes (fixing a leak, repairing a crack, addressing a corrosion issue, etc.). Hydro jetting can make the job easier by removing any buildup in your pipes that may affect the outcome of the job.


Choosing Hydro-Jetting for Clean Drains

Typically, Hydro-Jetting is not the first choice when it comes to drain cleaning. Most plumbing technicians will opt for a drain snake, which is a tried-and-tested method, but one designed for relatively minor clogs in the grand scheme of things.

However, that’s not to say Hydro-Jetting is an afterthought. It’s a technique designed for tough clogs. The benefits of this method include:

  • Fast Relief – The high-pressure water used to clean the drain is incredibly fast, ensuring quick relief from any size drainage clog.
  • Removes Extreme Blockages – The power of Hydro-Jetting is strong enough to clear away tree roots and serious drainage blockages when needed.
  • Versatility – Hydro-Jetting was built to work with all manner of plumbing pipes in or around your home.
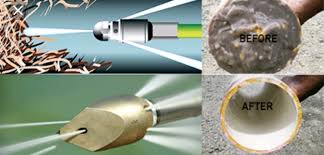
  • Eliminates Problems – This method helps eliminate all of your drainage problems, not just provide temporary relief. Hydro-Jetting will clean the pipe wall of any soap scum, grease, or gross buildups, including minerals from hard water.

As you can see, Hydro-Jetting is an effective method for homeowners seeking the ultimate cleaning experience. With high-pressure water blasting through your drains, there won’t be any lingering grease, food debris, or minerals in the system. Just a clear path for water and waste.


Hydro-Jetting In Residential, Municipal And Commercial Applications

For residential purposes, professional hydro-jetting can be very effective at clearing silt, build up over time and dirt from within pipe lines. In some cases, hydro-jetting serves as a viable alternative to manual pipe repair; non-invasive and a fraction of the price, hydro-jetting provides a residential pipe cleaning alternative few homeowners can pass up.

If you’ve been stuck in a loop of detecting clogs and snaking them out of your drain pipes, jetting may be just what you need to remove debris from your pipes for good.

When it comes to dirt, corrosion and build up within city sewer lines, non-invasive hydro-jetting is often the most affordable cleaning option available. With PSI levels in the tens of thousands, hydro-jetting clears municipal sewer line debris far more effectively than snaking, and at a lower price tag than other methods.

One of hydro-jetting’s biggest advantages, however, is that it’s entirely chemical-free, and causes zero damage to inner pipe walls. It’s not only effective for cleaning pipes, but also 100% safe for all types of pipe line, including:

  • Cement sewer lines
  • Steel pipe
  • Cast iron pipe
  • Orangeburg pipe lines
  • Existing PVC or resin-based pipe lines
  • Clay pipe

In commercial cleaning applications, hydro-jetting has become somewhat of a norm in regular plumbing upkeep, particularly for food and beverage industries. As byproduct clogging and build up is much more prevalent in these industries than in others, hydro-jetting is often conducted as part of regular plumbing maintenance.

Pipe and drain snaking helps remove large clogs within pipe lines, but does little to clear residual materials from pipe walls; jetting, on the other hand, removes this excess material with ease, in a single application.


Not sure if you should stick to snaking or hydro-jetting?

Snaking:

  • It is a commonly tried method: It works most of the time and gets the job done. We know that because plumbers have been using it forever.
  • Easy on pipes: If you have fragile or sensitive pipes, this is a good way to go.
  • Gets rid of minor clogs: If it is a small or minor clog in the pipes, snaking can tackle that easily for you.

The real downside to snaking is that this is not a permanent job. It is a temporary fix, meaning you will have to get it fixed again. How irritating, right? Now that you have gotten yourself a new water heater, it is important to know how to maintain it. You want to keep the water heater for the long run so small checks here and there will be useful.

Hydro-Jetting:

  • Clears out the pipe walls: It will get rid of any grease, minerals, and more. Cleans out the grease and pipe-wall build-up, as well.
  • Fast clearing: The clogs will be cleaned out quickly due to the high-water pressure.
  • No more dangerous blocks: Any serious blockage including tree roots can all be cleared out with the pressurized water. So you do not have to worry!
  • It is economical: This method will reduce your sewer services expenses in the long run.

Compared to a typical snaking the blockage will be cleared out for around 4 times longer! However, if you have really old and fragile pipes, hydro-jetting can damage your pipes. So just double-check with a professional if you are not too sure about the pipes you have. Are you convinced to give hydro-jetting a go yet? No? Alright, let us tell you more about hydro-jetting. It works on many pipelines and not only that but it is also safe! You guessed it! It works on: steel pipe, cast iron pipe, clay pipe, cement sewer lines, and more. Also, it is chemical-free and will not damage the inside of your pipes! How effective is it? To simply answer this, VERY. With all of the advantages it has, it is quite effective:

  • Can fit into thin pipes as 1 ½” diameter to as wide as 4’ diameter
  • Due to the water pressure, it can easily get rid of all tough cloggings and dangerous blockages inside.
  • Hydro-jetting gets to the roots of the problem so you do not have any other grease and build-up to worry about.
  • Can resolve minor plumbing issues in pipes before they go out of control, creating a bigger issue.

Hydro-jetting is effective and better for you in the long-run. It is going to clean out the pipes for a long period and will make you financially happy since you do not need to constantly clean or fix the pipes. If you’re unsure about pipes being too old, you can always call a plumbing company like No Worries Rooter, to come to check it out for you!


Why You Should Consider It

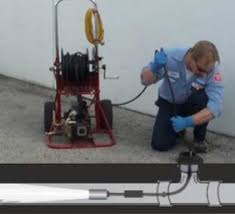
The great thing about a hydro jetting service is that it takes care of a lot of problems at once. Not only does it remove any clogs, it cleans out the whole system to prevent future clogs. It’s also the best way for a technician to perform a “check up” on your pipes and sewer lines. If there’s any damage in your plumbing system, we’ll see it with the hydro jetting tool’s camera.

Hydro jetting is also easier on pipes, generally, than snaking or using a different kind of a de-clogging tool. Rotating blades or mechanical snakes can cause damage to the inside of pipes. With hydro jetting, your technician can identify problematic locations in your system before the cleaning process begins. If the technician is afraid treating that area would damage the pipe’s integrity, they can work around it instead.

Most importantly, hydro jetting is simply extremely effective. The camera can actually see the problem. You get to watch your pipes get cleaned out until they look brand new. You get a complete look at your plumbing system and can accurately identify any problems. Think of a clog as a blockage in an artery. The hydro jetting pipe rejuvenation treatment is the plumbing equivalent of high-tech surgery. In some ways, it’s even better; unlike surgery, we don’t have to open anything up!

Tips On Choosing The Best Garbage Disposal For Your Home

Preventative Maintenance for Your Garbage Disposal

Anyone who’s had their garbage disposal break down knows the hassle that this small appliance causes when it stops working. Often this happens when people don’t understand the correct way to use it. Here are some basic dos and don’ts that will help you keep your garbage disposal clean and in good condition and save you money on repairs or replacements.

Garbage Disposal Dos:

  • Use cold water. Keep a steady flow of cold water during and after every use. Keep the flow going for approximately 15 seconds after grinding has ceased to ensure that the food washes through. Hot water can cause fat to conceal and stick to the blades and interior. Also, cold water helps keep the unit from overheating.
  • Clean with ice. Occasionally put a small amount of ice into the garbage disposal and run it to keep the unit clean. Make sure you put the rubber stopper over the opening before you run it to keep ice pieces from flying out.
  • Clean with de-greaser. Use a disposal cleaner or generic de-greaser occasionally to keep fat from building up. This will help with the unit’s efficiency and eliminate odors.
  • Clear the drain. It’s good to have the drainage pipe snaked approximately once every two years to prevent clogs and keep the sink draining smoothly.
  • Use citrus as a freshener. You can grind up citrus peels from lemons, limes, oranges, etc. to keep the disposal smelling fresh. The natural acid also hinders bacterial growth.

Garbage Disposal Don’ts:

  • Avoid hot water during grinding. It’s perfectly fine to run hot water in your sink after you’re done using the garbage disposal, but always use cold water during the grinding process. As stated above, hot water can make fats congeal and stick to the blades and interior of the unit.
  • Don’t run grease, fat, pasta or fibrous waste through. These materials will clog the drain. Dispose of them through solid waste channels. This includes tough plant fibers such as celery and potato skins. Pasta is notorious for clogging garbage disposals.
  • Don’t fill the disposal. If you have a lot of food waste to grind up, make sure you do it gradually. If you cram the disposal full, don’t be surprised if it can’t handle the load.
  • Don’t use harsh cleaning chemicals. These can cause harm to you, the plumbing system, and the environment as they flow through.
  • Only grind food. Don’t expect the garbage disposal to be able to handle paper towels, rags, plastic, or other non-edible materials.


Do the Following to Maintain a Clog-Free Disposal

  • Lots of water! The simplest way to avoid a clog is to make sure you flush the disposal with plenty of water when it is grinding up food waste and then for 30 seconds afterward. Then occasionally maintain your disposal by regularly grinding up pieces of lemon or orange peel and ice cubes.
  • Use dishwashing detergents that de-grease your dishes. Grease is the ‘glue’ that holds bacteria causing odors in your drain pipes and adds to the likelihood of the slow draining clogs you want to avoid.
  • Avoid grinding up potato peelings, banana peels, coffee grounds or eggshells as described above.

By following these simple tips you will help keep your garbage disposal trouble-free, sanitary and clean smelling.


NEVER Put These Items down the Garbage Disposal:

  1. Glass, metal, plastic, or paper (including cigarette butts, fruit stickers, string ties, etc.).
  2. Grease, oil, or fat (including meat fat and cheese). Put your grease in a metal or glass container and either save it for reuse or throw it out in the trash.
  3. Stringy, fibrous, or starchy vegetables (celery, corn husks, artichokes, onion skins, potato skins, etc… small amounts are probably fine, but it’s best to avoid these tough vegetables).
  4. Pasta or rice (foods that expand when water is added).
  5. Hard stuff (bones, pits, and seeds… although small fish and chicken bones are OK).
  6. Large amounts of anything (large amounts of anything will cause a garbage disposal clog).


ELIMINATING FOUL ODOR COMING FROM A GARBAGE DISPOSAL

Foul odors can occur from a buildup of food debris within your garbage disposal. To eliminate this unpleasant odor, you can place ice cubes and lemon or orange peels in your disposal. Then run the disposal for about 30 seconds, after that squirt a little liquid dish detergent into the disposal while it is still running. Finally, run cold water for about 30 seconds to rinse all the debris away.


Garbage Disposal Care

How to clean your disposal and a comprehensive list of what you can or cannot put in it

Whether you are a long time garbage disposal user, or have just chosen your first ever disposal, knowing how to care for it will go a long way to making your experience a good one. Garbage disposals are valuable household tools, when used properly. If you are careful with what you put through your disposal, and keep it clean, it should provide you with many years of carefree service. Many of the common frustrations users experience can be avoided by following just a few tips.

Help! It Stinks!

A common garbage disposal complaint is bad odors. This is often due to a failure to run enough water through and ensure everything is adequately flushed out. To keep your disposal fresh and clean, consider the following tips:

  • Grind Thoroughly – Make sure you allow adequate time for everything to get ground and flushed with water. Leftover particles cause odors.
  • Clean Regularly – At least once a week, take a bottle brush and scrub inside the disposal. This small maintenance step will go a long way to keeping it fresh.
  • Grab Citrus – Fresh orange, lemon, or limes can help cut grease and eliminate odors. Simply grind pieces in the disposal.
  • Vinegar is Good – Freeze some vinegar in ice cube trays and blend in the disposal. This helps to eliminate bacteria which can cause odor.

Must Know How To Fix Broken Pipes

How to Locate a Broken Pipe in a Wall

Confirm that you have a water leak by shutting off your water-using appliances and fixtures. This includes faucets, showers, washing machines and refrigerators.

Check your water meter box, which is typically located near the main water shutoff valve on the outside of your home. If the meter is moving, you may have a leak somewhere in the system.

Examine the walls in your home for water damage, such as bubbled paint, stains and cracks. Leaking water pipes may also leave wet spots on the wall. But the location of this damage is not usually the exact location of the leak. Water may run the length of a broken pipe and pool at a different location in the wall.

Inspect your crawlspace or basement in the area directly beneath where you find water damage. Look for pools of water or leaks where the plumbing pipes run through holes in the floor.

Look at exposed pipes near the walls in your basement or crawlspace. Corrosion or moisture on or around these pipes indicates a leak nearby. If there is mold, mildew or rotted wood near the pipe, the broken pipe is likely behind the wall next to or above this location.


How to Fix a Broken Pipe Inside a Wall

What Causes Pipes to Break?

Very cold weather is the leading cause of bursting pipes. It causes the water inside them to expand and get close to freezing. When the pressure increases too much, the structure of the pipe gets damaged. This usually happens when the temperature goes down to -6 degrees C.

How Do You Know if a Pipe Has Burst

The signs of a burst pipe can often go unnoticed or they can be all over the place, depending on the spot and magnitude of the rupture. The signs will always include water.

How to Locate the Broken Pipe

When ice forms inside your pipes, it doesn’t necessarily damage the spot where it formed. Sometimes, all the ice does is create a blockage, building pressure that will erupt at the most vulnerable spot, which may be found somewhere else. That’s why it’s very important to locate the exact place of the breakage.

How to Fix a Broken Pipe Inside a Wall

Fixing a pipe inside a wall is no easy task, so it’s a lot better to let a professional plumber deal with this. But if you feel confident you can do it yourself, just follow these instructions.

How to Prevent Pipes from Freezing

If you value your house, you have to pay a lot of attention to the plumbing. If you prefer not to call a plumber every winter, you need to take preventive measures against low temperatures.


HOW TO FIX A BROKEN PIPE UNDER THE HOUSE

WHAT IS A SLAB LEAK?

A slab leak is an industry term for a leak within the waterline piping below a home’s concrete floor, and they can occur in homes and buildings of all ages. Broken water pipes under your home can cause irreparable damage to foundations and cost tens of thousands of dollars to repair. The extent of the damage can be exacerbated by certain types of soils (expansive soils) which absorb greater quantities of water and expand, often causing slabs to lift and crack (see our article The best ways to repair sewer pipes and collapsed drains under slabs).

SIGNS OF A WATER LEAK UNDER THE HOUSE

While water leaks under house slabs are notoriously good at remaining hidden from the untrained eye, knowing what to look for and regularly checking can help you get on top of things before they do too much damage.

MORE SERIOUS SIGNS OF STRUCTURAL DAMAGE FROM WATER LEAKS UNDER SLABS

Sewer line leaks can be a bit more difficult to spot but they can be just as damaging, particularly in areas with expansive soil. Expansive soils contain minerals that absorb water (such as clay soils) which can increase the soil volume by up to ten per cent, which is why leaking sewer lines under slabs can be so serious.

WHAT TO DO IF YOU HAVE GOT A LEAKING PIPE UNDER YOUR HOUSE

ESTABLISH THE LOCATION OF THE LEAK The first step is to establish where the leak(s) are located. If you see or hear water in one particular section of your floor, you might be able to take an educated guess, but there is no guarantee the offending pipe will be located right beneath the wet patch you’ve noticed on your carpet. Water is notorious for pooling in empty or low-lying cavities so the actual break or crack could be some distance away. You won’t be popular if you assure your wife you can repair the pipe yourself and cut up the concrete in her new bathroom floor – only to find the water’s coming from a leaking join two metres along the line.

ARM YOURSELF WITH NUMEROUS QUOTES AND INFORMATION Once the presence and location of a leak have been confirmed, the next step is the repair. If the leak is outside the perimeter of the slab or near the edge, and you know a bit about basic DIY plumbing, you might be lucky enough to be able to reach and repair it yourself without too much trouble.


What to Do When a Pipe Bursts in Your Home

Freezing weather

Extremely cold temperatures, which people in Northern Illinois and Indiana can attest to, can be the most common source of a burst pipe, because when water freezes it expands. Expansion is not something most pipes can handle, so they will split and burst.

Corroded pipes

If you live in an older home, you’ve probably got some pipes that are corroding on the inside. If you live in an area where the pH is out of balance, you’re pipes will corrode at a faster rate.

Moving pipes

Have you ever turned off the water in your home and heard/felt a bang? That’s called water hammer, and it occurs when pipes aren’t secured. Movement is not good on your pipes, particularly in the joints connecting one pipe to the next.

Stop the flow

The only way a burst pipe is going to stop leaking is for the water main supply valve to be turned to the off position. Find out exactly where your water main is and rehearse the steps you need to take to get there and whether you’ll need a tool to turn off the water.

Stay clear of appliances

Again, floods are an electrical hazard, which means you don’t want your feet in water and then touch something with amperage going to it.


Tips For Handling Broken Water Lines Or Pipes

Make A Call

When you are experiencing a leak, your first step should always be to contact a professional leak detection and restoration company. Even if you have experience with plumbing, a professional is equipped with the proper tools to get the problem resolved quickly to minimize the amount of time spent waterless and minimize the amount of damage traveling water can cause inside of a home.

Turn Off Your Water

While this may seem obvious as you are reading this, in a state of panic, it may not be. Your best bet may be to turn the water off to the entire house by turning it off at the meter. This will immediately prevent additional water from continually flowing out of the leak and prevent further damage.

Find The Leak

Next on our tips for handling broken water lines or pipes list can be a tough one. In order to provide a temporary fix to the leak, you’ve got to find the leak. While some may be easy to spot, others may be more difficult, somewhere behind the drywall for example. If that’s the case, be prepared to cut into your drywall.

Patch The Leak

Now that you (or a professional) have found the leak, it’s time to patch it. Sometimes a professional can’t be reached and you may have to create a temporary fix. We suggest using – or make shifting – a pipe clamp to prevent the water from leaking for a short time. A pipe clamp is made of metal, lined with rubber, which locks down over a leak to prevent the free flow of water.

Tips For Handling Broken Water Lines or Pipes

Here, at Leak Science, we harness and utilize two things that generally makeup leak detection – technology and science. Using highly sensitive equipment we are able to find the leaks that continue to cost you money every day until they are located and repaired. We often work against a maze of 100’s of feet of plumbing running in different directions to and from and all-around your home. We know and understand water lines and pipes very well so when it comes to looking for a leak we know what to look for.

Tips To Make Electronic Leak Detection

Why is Refrigerant Leak Detection Necessary?

Refrigerant leaks can lead to downtime.

Hotels, restaurants, bakeries, catering facilities, cold storage facilities, supermarkets, medical facilities and many other commercial and industrial facilities rely heavily on air conditioning and refrigeration systems to run their daily operations. A refrigerant leak followed by an unexpected breakdown can cause unplanned facility downtime, negatively impacting your revenue and reputation.


Importance of Spotting Leaks

It’s vital to identify and repair any leaks in your A/C unit early. The benefits vast outweigh the short-term burden of paying to have them fixed, and you’ll be kicking yourself down the road if a smaller leak grows larger and becomes a serious issue.

  • Savings! – When refrigerant leaks, the A/C unit has to kick into overdrive to compensate for the loss. As a result, your energy bill is going to spike to match that extra work.
  • Environmental factors – An improperly charged unit becomes much less energy-efficient, and the carbon dioxide emissions contribute greatly to the greenhouse effect. By getting ahead of refrigerant leaks, you’re helping out the environment!
  • Prevents damage – If an undiagnosed leak flies under the radar, it can gradually become something that can cause significant damage to your home. Water that freezes due to the leak can thaw and seep into the rest of the house and wreak havoc.


Detecting Refrigerant Leaks

November 2015 — Recovery of refrigerant is mandatory. It is important to follow all Environmental Protection Agency (EPA) and Occupational Safety and Health Administration (OSHA) safety guidelines when working around machinery and refrigerants. If the refrigeration system contains more than 50 pounds of refrigerant and has an annual leak rate of 15 percent or more for comfort cooling, or a 35 percent leak rate for commercial refrigeration, the EPA has mandated that it must be repaired.

How do we know if there is a refrigerant leak? Most of the time someone calls and reports that the air conditioning is not working properly. By checking system pressures and temperatures, you can determine whether the system refrigerant charge is either low or empty. Refrigerant leaks typically fall into four types:

  • Standing leaks:occur even while the unit is turned off
  • Pressure leaks:occur at a certain pressure
  • Vibration leaks:occur when a strain is put on a line or component
  • Temperature leaks:occur as a result of the expansion and contraction caused by temperature change

One way to start checking for a refrigerant leak is to listen to the system. Most of the time it will be hard to hear any gas escaping because equipment noise is too loud or the leak is too small.


Why is a Leak Detection Test Necessary?

If your air conditioning system stops working and an HVAC tech diagnosis the problem as low refrigerant, you’ll obviously want them to refill your refrigerant. Even though this will get your air conditioning up and working again, blowing cold air, this is just a Band-Aid solution to the real problem: finding and fixing the leak. By just filling up the system with new refrigerant, you’ll end up having to continue to buy more and more refrigerant as it continues to leak out of your system.

What Types of Leak Detection Tests Are There?

There are a wide variety of leak detection tests. Which one the technician uses for your system depends on what type of system and refrigerant you have and where the technician thinks the leak may be. Here are a few types of leak detection tests your technician may complete:

Bubble Solution

This is the simplest leak detection test. With access to accessible refrigerant lines, the technician is able to place a bubble solution on the line. If the line begins to bubble, the technician can tell that the gas is leaking out of the line and can patch the hole.

Fluorescent Leak Detection

If your technician refills your refrigerant and they suspect there’s a leak, they’ll most likely include some fluorescent dye with the refrigerant. They’ll come back later to use a UV light and see if any of the dye has leaked out of the lines. Once they find where the dye is located, they can easily locate and repair the leak. However, there are different dyes for different systems and refrigerants, and using the wrong dye with the wrong system can ruin an entire air conditioning system. That’s why it’s extremely important to hire a qualified technician.

Halide Torch

A halide torch has a flame that, when it comes in contact with chloride atoms, turns green. However, this isn’t always an effective test because not all refrigerants have chloride.

Electronic Detectors

There are a few different types of electronic detectors. One, the corona-suppression uses an electric current to detect leaks. When the electric current drops, gas is detected. The lower the drop in electric current, the higher the amount of gas.

A heated diode detector heats the refrigerant and breaks the molecules into negative and positive charged atoms. The positive atoms in the gas will attach to the negatively charged wire on the detector, and the detector will sense them, showing a gas leak when the detector goes off.

Ultrasonic Detector

An ultrasonic detector can hear where the gas is escaping in the line, even with pinhole sized leaks.


Repairing the AC Refrigerant Leak

Repairing a refrigerant leak in your AC unit usually requires hiring a skilled technician. For the DIYers, repairing a refrigerant leak in the air conditioner unit can be inexpensive if all that’s needed is to tighten a fitting or replace a valve core. At the same time, it can be very pricey if it repairs involve replacing the evaporator coil or copper line set.

Whether you try to repair the leak or hire a technician, there are some common sites to watch for leakage. These include:

  • Copper tubing
  • Shipping valves
  • Filter canisters
  • Weld joints
  • Valve cores

As mentioned previously, technicians may use an electronic sniffer to identify AC refrigerant leaks. Bigger leaks typically require using soap bubbles or the black light method.

The black light method requires installing a liquid tracer into the system and let it circulate for a couple of weeks. During this period, the tracer will ooze out slowly from places where there is a leak.It is common knowledge that refrigerants are very expensive. Time and effort spent to locate leaks, plus repairing AC equipment makes it imperative for preventive maintenance of systems. The best way to begin repairing to select a method that can quickly pinpoint leaks. This will not only keep loss of refrigerant at a minimum, but it will also help you avoid headaches and scorching heat.